

Catalyst Rōpū kohinga is delighted to join the Koha community in celebrating the release of Koha 23.11. This release contains 10 new features, 330 enhancements, and 573 bug and security fixes.
Every six months the Koha community does a major release, such as Koha 23.11. Major releases are when most new features and enhancements are added to Koha and made available to libraries.
In this blog post, Alex Buckley, Catalyst Rōpū kohinga developer has highlighted 12 enhancements available in Koha 23.11.
Check out the full Koha release notes.
If you would like to try out the new version as you read along, head to the demo of Koha.
12 enhancements in Koha 23.11
Acquisitions
1. Optionally choose for tax-exclusive values to be used for calculating fund values [31631]
This enhancement was sponsored by one of our partner libraries, the Waikato Institute of Technology. It adds a new system preference CalculateFundValuesIncludingTax.
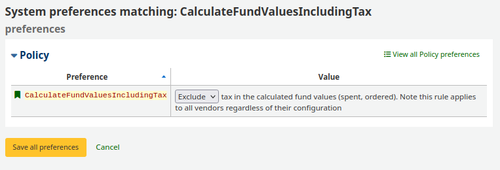
When set to ‘Exclude’, libraries can enter costs as they appear on the invoice, when creating and receiving orders. For example, including GST. However, on the Acquisitions homepage Koha will deduct costs excluding tax from the library funds.
Some New Zealand institutions such as public and tertiary libraries are able to claim tax back on their purchases. This enhancement allows libraries to avoid manually subtracting tax from prices and view budgets without the tax they’ll claim back.
This is a great example of the global Koha community better supporting the needs of libraries in Aotearoa New Zealand.
2. Ability to modify an order line to increase the quantity of ordered items [34708]
Acquisition baskets can be configured to create item records either when the order is placed or when received.
Until Koha 23.11, if configured to create items when placing an order, the quantity of ordered items could not be changed until the order was received. Thanks to sponsorship from our partner library Pymble Ladies’ College, the quantity can now be updated before the order is received.
Simply navigate to an open basket and ‘modify’ the order line you wish to update.
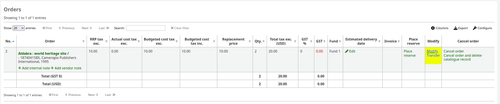
When the ‘Modify order line’ page loads, use the ‘Item’ form to add new items, updating the quantity and associated cost of the order.

Circulation
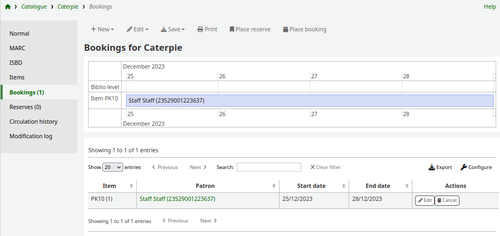
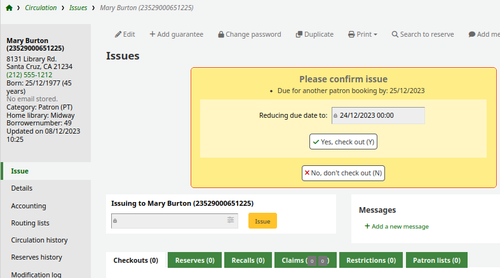
3. Add the ability to book items ahead of time [29002]
Libraries can now assign an item to a patron for a specified date range. This is different from a hold, which would assign an item right away to the first patron in the holds queue.
How to add a book item ahead of time:
1) Mark an item as ‘bookable’ - go to the bibliographic detail page in the staff interface, click on the Items tab, and set the ‘Bookable’ dropdown to ‘Yes’.
2) A ‘Place booking’ button will appear in the toolbar on the staff interface. When clicked, a pop-up loads where librarians can place a booking for a patron.
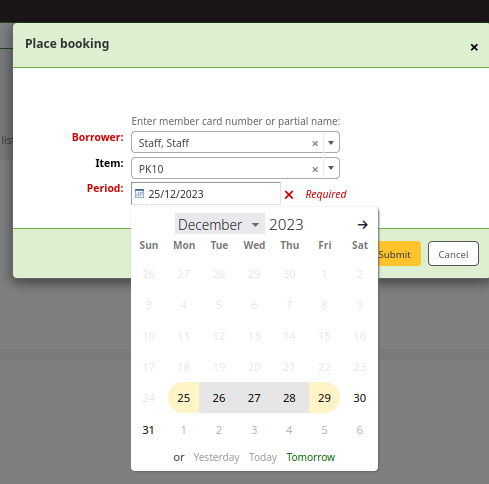
3) Dates appear greyed out when they have been booked and the item is unavailable over those days.
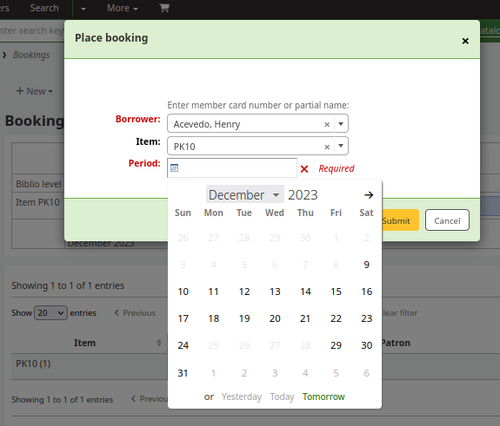
4) To edit or delete bookings, use the ‘Bookings’ tab on the left-hand side of the bibliographic detail page.
Note: This tab is only displayed if at least one item attached to the bibliographic record has been configured to be bookable.
5) A checkout will be blocked if the patron does not have a booking on the item unless the librarian overrides permissions.
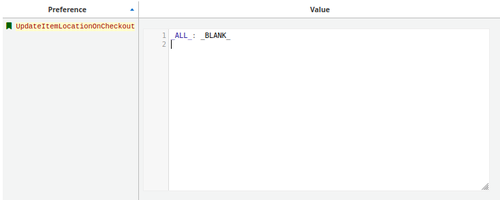
4. Update item shelving location (952$c) on checkout [21159]
Koha is wonderful for automating many library tasks, such as changing the shelving location of items.
Libraries could already automatically change an item’s shelving location upon check-in. Thanks to sponsorship by partner library Toi Ohomai Institute of Technology, shelving locations can now also be updated upon checkout.
This enhancement introduces a system preference named UpdateItemLocationOnCheckout. In this system preference, define a rule with a starting shelving location and a new shelving location, separated by a colon. For example:
NEW: _BLANK_
This rule describes behaviour where items with a shelving location of NEW will have their shelving location changed to be blank when checked in.
To change the shelving location of all items upon checkout, use the _ALL_ keyword on the left-hand side of the rule:
ALL_: _BLANK
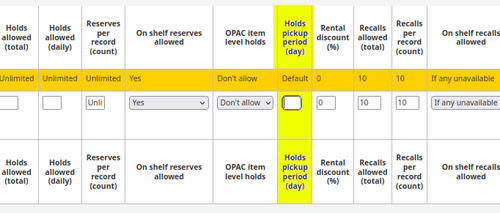
5. How long is a hold waiting for pickup at a more granular level [8367]
Previously, libraries could define how long all items should await pickup before their hold is expired and the item is marked as ‘available’ in the catalogue. This could be automated by configuring the cancel_expired_holds.pl cronjob and enable the ExpireReservesMaxPickUpDelay system preference.
Libraries can now set this rule at a more granular level, via the circulation and fine rules page in the Koha Administration module. Each patron category, item type, and library combination can have a different number of maximum days for awaiting pickup for a hold.
Holds
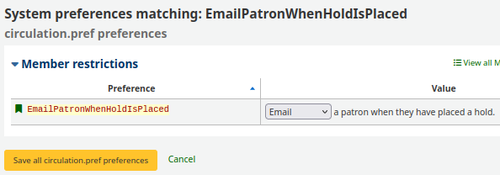
6. Add the ability to send a confirmation e-mail to a patron when a hold is placed [17617]
Would you like to be able to send a confirmation notification to a patron when they place a hold? Now you can, thanks to this enhancement from partner library Fire and Emergency New Zealand.
Enabling the new EmailPatronWhenHoldIsPlaced system preference will send the HOLDPLACED_PATRON email notice to a patron upon confirmation of a hold.
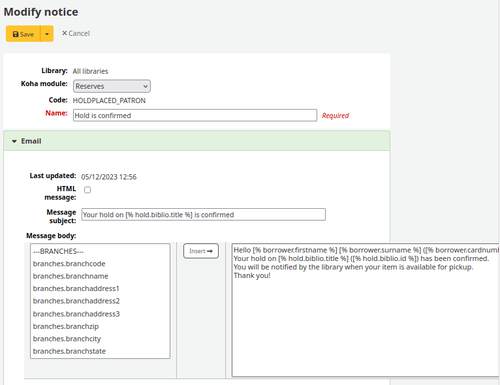
The wording and content of the HOLDPLACED_PATRON email notice can be changed in the ‘Notices and slips’ tool, where all notices are fully customisable.
Authorities
7. Allow specifying default tab view for authorities [34075]
Cataloguing is all about efficiency. This enhancement supports that.
It’s now possible for libraries to define which tab is displayed when viewing an authority record in the staff interface. Using the new DefaultAuthorityTab system preference, librarians can define which of the following tabs they want displayed by default: 0xx, 1xx, 2xx, 3xx, 4xx, 5xx, 6xx, 7xx, 8xx, 9xx.
Setting the system preference to 6xx would mean MARC fields in the 6 tabs (generally fields between 600-699) are displayed first.
This enables libraries to navigate to the important authority information with one less click.

Notices
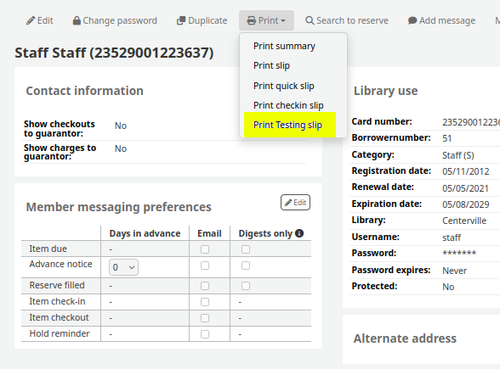
8. Add the ability to generate custom slips for patrons [32986]
Patron slips can be handy for sharing all sorts of information, for example, upcoming planned library closures, important library news, and changes to fines policies.
Traditionally, Koha has only been able to print an account summary, checkout summary, checkouts today, and check-in slip.
Now libraries can create and print custom slips from patron accounts.
To create a custom slip:
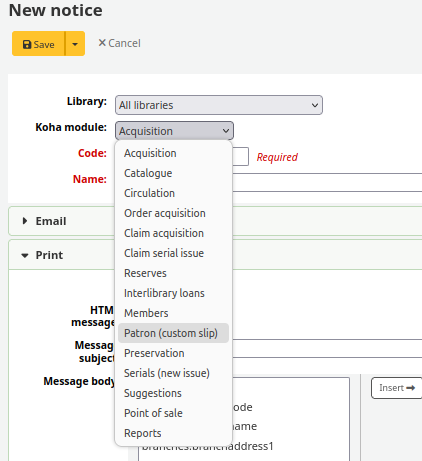
1) Go to Tools > Notices and slips > + New notice.
2) Change the ‘Koha module’ dropdown to ‘Patron (custom slip)’.
3) Set a code and name for the slip.
4) Click the ‘Print’ expandable button. Enter a ‘Message subject’ and ‘Message body’ and save.
5) Navigate to a patron account and click on the ‘Print’ toolbar dropdown. The new custom slip will be available to print.
OPAC
9. Add the ability for OPAC users to checkout for themselves [30979]
Libraries use many different methods to enable patrons to check out items to themselves, for example, self check machines and the Koha self-checkout module.
This enhancement adds another option, especially useful if a library uses both the Koha self checkout module and Single Sign-On authentication.
If the new OpacTrustedCheckout system preference is enabled, OPAC users will see a ‘Self checkout’ button appear in the OPAC header.
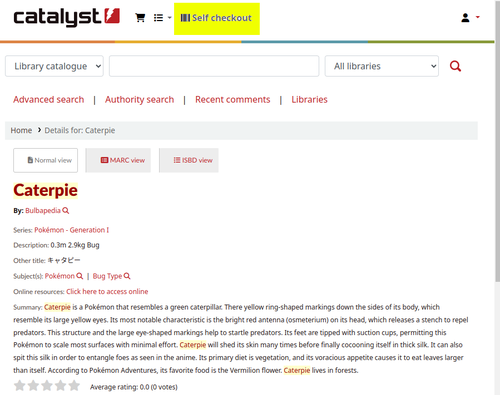
When clicked, the user will be prompted to log in. After logging in they will be able to enter an item’s barcode and check out the item to themselves.
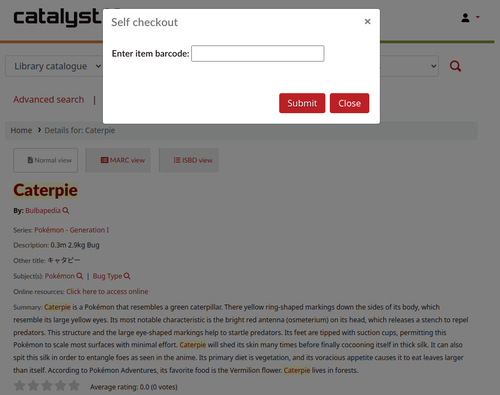
If your self-check setup requires OPAC users to type in the barcode (i.e. the library does not have a scanner) make sure that the barcode column is visible in the Holdings table. This is configurable in ‘Administration’ > ‘Additional parameters’ > ‘Table settings’ > ‘OPAC’ > ‘table id: holdingst’. Ensure the ‘Is hidden by default’ checkbox is not selected for the item_barcode.
10. Allow specifying UserCSS and UserJS at the library level for the OPAC [32721]
Librarians can now define different CSS and Javascript (JS) to customise the OPAC view for each of their libraries. Developers use CSS to apply custom styles to a website, such as colours and fonts. JS is used to dynamically change a page, such as making elements fade into view or pop-up windows.
Previously, libraries could define CSS and JS using the OpacUserCSS and OpacUserJS system preferences which applied to the whole OPAC. For different locations to show different styles, Koha providers would need to do some clever customisation.
We’re pleased this functionality is now available in stock Koha. This means with minimal Koha vendor support, libraries can style each of their OPACs to best suit their needs. Additionally, library-specific customisations be much easier to maintain through Koha upgrades.
Each library (editable at: ‘Administration’ > ‘Basic parameters’ > ‘Libraries’) now has editable UserJS and UserCSS fields. This is where styles specific to that library’s OPAC can be set.
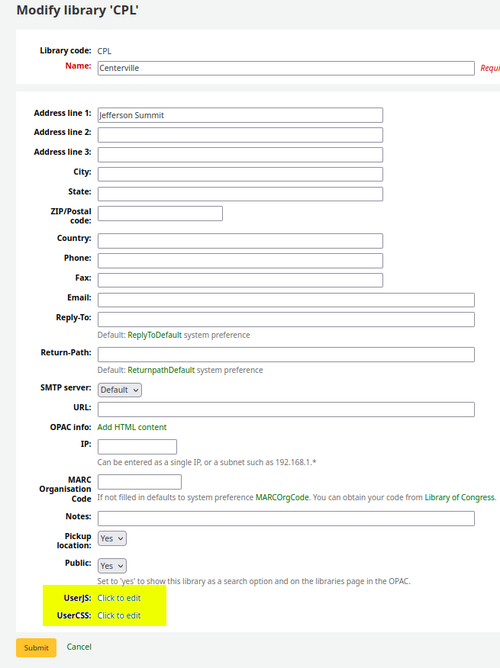
For logged in users, their OPAC will use the CSS and JS configured for their home library, set in their patron account.
- When not logged in, they will see CSS and JS that apply to all library OPACs, defined in the OpacUserCSS and OpacUserJS preferences.
Patrons
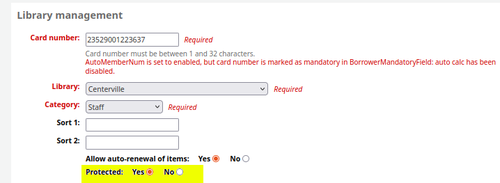
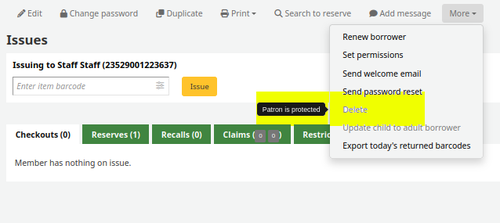
11. Add protected status for patrons [26170]
It’s now possible to set a patron account as ‘Protected’. Protected patron accounts cannot be deleted or merged, manually or by cronjobs.
To mark a patron as protected, navigate to a patron account page, edit the account, and set the ‘Protected’ option to ‘Yes’ in the ‘Library management’ section.
If a librarian tried to manually delete a protected patron account, the Delete button would be disabled and greyed out.
Staff client
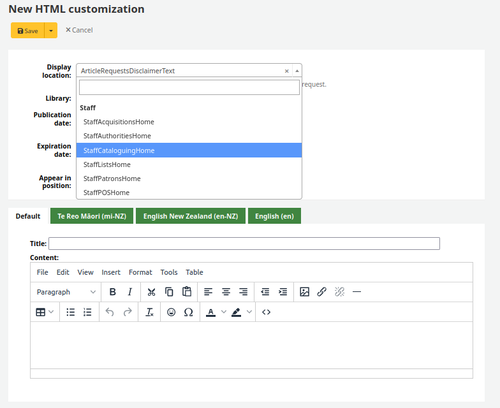
12. Add customizable areas to intranet home pages [6419]
Libraries can now add even more custom content to their staff interface!
In 22.11 bug 15326 enabled libraries to create new, content-customisable pages in both the OPAC and staff interface. This Pages tool is a useful method for sharing knowledge with library patrons and staff.
This enhancement builds on that. Libraries can now add custom content to be displayed at the bottom of many staff interface pages.
There are a number of new staff interface locations available in the ‘Display location’ dropdown in the HTML customisations tool.
Libraries can now define custom content for StaffAcquisitionHome, StaffAuthoritiesHome, StaffCataloguingHome, StaffListsHome, StaffPatronsHome, StaffPOSHome, and StaffSerialsHome.
This could be used to link to cataloguing guidelines to the cataloguing and authorities pages (using ‘StaffCataloguingHome’ and ‘StaffAuthoritiesHome’). Libraries could also link important Koha SQL reports to the acquisitions page (using ‘ StaffAcquisitionHome’).
Read more about the 10 new features, 330 enhancements and 573 bug and security fixes of the 23.11 Release on the Koha Community website.
Catalyst Rōpū kohinga
If you have any questions or comments about this blog or would like some support with your Koha instance, you are welcome to email us.