
Libraries can now administer agreements, licenses and electronic holdings from within Koha: one system for both electronic and physical collections. Examples of the sorts of electronic resources libraries might choose to manage using the ERM module include: eJournals, eBooks, databases, software, media and websites.
Start using the ERM module
System preferences
To start using the ERM module you must enable the ERMModule system preference (which can be accessed in the Koha staff client by going to: Administration > Global system preferences > E-resource management). This system preferences is the master switch for making the ERM module visible within the staff client.

There are three other ERM system preferences:
- ERMProviderEbscoApiKey
- ERMProviderEbscoCustomerID
- ERMProviders
If your library has a subscription with EBSCO then you’ll want to tick EBSCO checkbox in the ERMProviders syspref. Request an API key and customer ID from EBSCO and enter them into the ERMProviderEbscoApiKey and ERMProviderEbscoCustomerID system preference to be able to manage EBSCO electronic holdings from the ERM module.
Permissions
All Koha staff patron accounts who need to access the ERM module MUST have the ‘erm’ permission ticked.

Authorised values
The ERM module takes full advantage of Koha authorised values - customisable values you can create to display as options in dropdown fields throughout Koha.
To customise the default authorised values that come with the ERM module go to: 'Administration' > 'Authorised values', then search for 'ERM_'. That will filter down to the ERM related authorised categories.

Each authorised category name is a link, clicking on it will load a page where you can add/edit/remove authorised values in the category.
Navigate to the ERM module
After the ERMModule system preference is enabled patrons accounts with the ‘erm’ permission ticked will see an 'E-resource management' button on the staff client home page.

Clicking on the ‘E-resource management’ module button users will see the three components of the ERM module: agreements, licenses and eHoldings down the left hand side of the page.

Agreements
An agreement outlines which electronic resources the library can access. Using the ERM module libraries can create, find and manage agreements.
Create an agreement
'E-Resource management' > 'Agreements' > 'New agreement'.
Useful things to note when creating agreements:

- 1) Vendor dropdown: You can link an agreement to a vendor in the Koha Acquisitions module. Currently, it’s not possible to see the agreements from within the Acquisitions module. However, the Koha community aims to more closely link ERM and acquisitions so in the future libraries can create orders for agreements.
- 2) Status: This describes the current status of the agreement. You can customise the options shown in this dropdown from the 'ERM_AGREEMENT_STATUS' authorised category.
- 3) Closure reason: This dropdown is greyed out, unless you have the 'Status' dropdown set to 'Closed'. The options in this dropdown can be customised in the 'ERM_AGREEMENT_CLOSURE_REASON' authorised category.
- 4) Renewal priority: The options in this dropdown can be customised from the 'ERM_AGREEMENT_RENEWAL_PRIORITY' authorised category.
- 5) License info: If you do not plan to create a license record then it’s recommended you enter basic information about the license that the agreement is associated with.
- 6) Periods: These are the periods of time that the agreement has been active for. Each time you renew the agreement you should create a new agreement period.
When creating an agreement you can add multiple periods covering the past, present and future. That way your library has historical context on the relationship between the library and the vendor.

- 7) Users: Choose Koha patron accounts who are involved in managing the agreement. Patron accounts without the 'erm' patron permission ticked will not be available to be added. It’s possible to define how each patron account is involved in the agreement using the 'Role' dropdown - these dropdown options can also be customised from the ERM_USER_ROLES authorised category.
- 8) Licenses: When creating an agreement you can link it to a pre-existing license: When linking licenses you can save the URL to online copies of the license, additionally, you can document the physical location of printed license copies is in your library.
- 9) Related agreements: It is possible to link existing agreements that are related to the new agreement you are creating.
- 10) Documents: This could include PDFs and other documents containing communications between your library and the vendor.
Finding agreements
Visiting the agreements page (E-Resource management > Agreements) a table displays all the existing agreements stored in Koha. If a library has many agreements identifying a specific one is easy using the filters provided:
- 1) 'Filter by expired': Selecting this checkbox and clicking 'Filter' will show only agreements expired before the current date.
- There is also a date field. Use that to find any agreements expiring before a specific date in the future. That way you can find any agreements needing renewing in the near future.
- 2) Search box: Like with other tables in Koha there is a search box. It dynamically filters agreements by whatever text you start typing into the search box – no need to click a ‘Search’ button.
- 3) Table column filters: The second row of the agreement table contains text search boxes and dropdown fields. You could choose the 'Active' option in, for example, the ‘Status’ dropdown option, and the agreement table would automatically only display agreements with an active status.

Licenses
A license outlines what the library can do with the electronic resources they can access.
A great feature of the ERM module is instead of storing license documents in filing cabinets or computer folders you can upload them into the ERM module.
Creating licenses
'E-Resource management' > 'Licenses' > 'New license'.
Creating licenses has some some similarities to creating agreements, some useful things to keep in mind are:
- 1) Vendor dropdown: This contains vendors you have created in the Koha Acquisitions module.
- 2) Type dropdown: The options in this dropdown can be customised in the 'ERM_LICENSE_TYPE' authorised category.
- 3) Status dropdown: The options in this dropdown can be customised in the 'ERM_LICENSE_STATUS' authorised category.
- 4) Users: Like in agreements, select Koha patron accounts involved in managing the license
- 5) Documents: This is where you can actually upload the license document to Koha.

Finding licenses
Finding licenses is much the same as finding agreements. You can use the search box or table filters. One difference is there is no 'Filter by expired' checkbox.
eHoldings
Track packages (collection of titles), or individual titles your library accesses with a subscription to a large database provider (currently only the EBSCO integration is available) or stored locally.

Having both the EBSCO and Local checkboxes selected in the ERMProviders system preference (see above) will enable librarians to see EBSCO and Local eHoldings links on the left hand menu of the ERM module (see below).

What is the difference between EBSCO and local eHoldings?
If your library has a EBSCO subscription then it’s recommended you have the EBSCO option selected in the ERMProviders system preference. The EBSCO eHoldings pages are basically an integration with the EBSCO Knowledge Base enabling you to manage resources held in the EBSCO Knowledge Base – not the Koha database.
Local eHoldings are electronic resources stored in the Koha database. They have a local Koha bibliographic record which is searchable from the Koha catalogue. Essentially, they are all electronic resources not from EBSCO.
EBSCO eHoldings
Koha ERM module integrates with EBSCO if the ERMProviderEbscoCustomerID and ERMProviderEbscoApiKey system preferences are configured. Meaning librarians can view, and edit, their EBSCO holdings within Koha, as though they were in the EDSadmin interface. To configure those system preferences you need to:
- Enter your customer ID in the ERMProviderEbscoCustomerID system preference.
- Ask EBSCO for an API key to enter into the ERMProviderEbscoApiKey system preference.
The Koha ERM module uses the EBSCO HoldingsIQ API to integrate with EBSCO. This is a bidirectional API, meaning you can make changes in Koha and they will appear in the EBSCO Knowledge Base and visa versa.
If your library uses Coral, it’s interesting to note that Coral also uses the HoldingsIQ API to integrate with the EBSCO Knowledge Base.
Searching EBSCO titles
If you go to the EBSCO Titles tab (E-Resource management > eHoldings > EBSCO > Titles) then you can search the EBSCO Knowledge Base by entering a publication title. That will fetch results from the EBSCO Knowledge Base and display them within Koha.
Filter the results using:
- ‘Publication type’ - This dropdown contains options defined by EBSCO, not configurable in Koha authorised values.
- ‘Selection status’ - This refers to if the title is selected – shown by having a tick icon in the 'Title' column of the results table. A ‘selected’ title is one which your library is subscribed to through EBSCOadmin.
EBSCO eHoldings title search. With the ‘Selection status’ filter (highlighted yellow) set to ‘Selected’. Every title in the table of results has a tick (highlighted yellow) – showing the library is subscribed to the title via EBSCOadmin.
Clicking on a EBSCO title link in the table of results you can view metadata about the title (all of which comes from EBSCO), including:
1) Title identifier: This is the identifier from EBSCO.
2) Packages filter: You can filter the packages the title is included in. The most useful filter is the “Selection status’ filter – enabling you to see if the title is included in an EBSCO package your library is subscribed to.
3) Packages: A title can be included in many different packages. Some of which your library is subscribed to, this is indicated if the package name has a tick next to it – as the ‘EBSCO eBooks’ package does in the below screenshot.

EBSCO title page showing metadata about the title – including the title identifier (numbered 1), package filters (numbered 2) and a table of packages the title is included in (numbered 3).
Searching EBSCO packages
If you go to the EBSCO packages tab (E-Resource management > eHoldings > EBSCO > Packages) then you can search the EBSCO Knowledge Base by entering a package name. That will fetch results from the EBSCO Knowledge Base and display them within Koha.
Filter the packaged using:
- ‘Content type’ – This dropdown contains options defined by EBSCO, not configurable in Koha authorised values.
- ‘Select status’ – As with the EBSCO titles page this refers to if the package is selected (subscribed to). Subscribed packages also display with a tick in the ‘Name’ column.

Changes that you can make to EBSCO eHoldings
You can make the following changes in the Koha ERM module and they will automatically show in EBSCOadmin within a matter of seconds.
Link an EBSCO package to a Koha agreement:
- 1) Koha staff client home page > E-Resource management > eHoldings > EBSCO > Packages
- 2) Search for an agreement with the ‘Selection status’ dropdown = ‘Selected’ - that is find an EBSCO package you are subscribed to via EBSCOadmin.
- 3) Click on the package name
- 4) Click on the ‘Add new agreement’ button – highlighted yellow in the below screenshot.

- 5) Search for an agreement and click ‘Select’ - highlighted yellow in the below screenshot.

Remove a title from an EBSCO package the library is subscribed to:
- 1) Koha staff client home page > E-Resource management > eHoldings > EBSCO > Titles.
- 2) Search for a title with the 'Selection status' dropdown = 'Selected'
- 3) Click on a title
- 4) Filter the 'Packages' table by clicking on 'Show filters', choose 'Selection status' = 'Selected', click 'Choose'
- 5) Click on a package name - this package is one your library is subscribed to.
- 6) Click 'Remove title from holdings' – highlighted yellow in the below screenshot.

- 7) The agreement is now linked to the EBSCO package – highlighted yellow in the below screenshot.

Add a title to an EBSCO package:
- Koha staff client home page > E-Resource management > eHoldings > EBSCO > Titles.
- Search for a title with the 'Selection status' dropdown = 'Not Selected'
- Click on a title
- Filter the 'Packages' table by clicking on 'Show filters', choose 'Selection status' = 'Not Selected', click 'Choose'
- Click on a package name
- Click 'Add title from holdings' – highlighted yellow in the below screenshot.

Add an EBSCO package to the library EBSCO holdings:
- Koha staff client home page > E-Resource management > eHoldings > EBSCO > Packages
- Search for a package with the 'Selection status' dropdown = 'Not Selected'
- Click on a package
- Click 'Add package to holdings' – see highlighted yellow in the below screenshot.

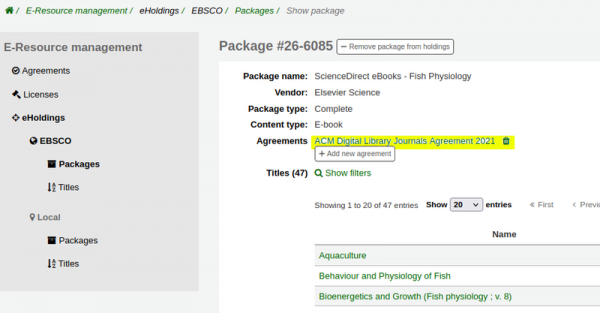
Remove an EBSCO package from the library EBSCO holdings:
- Koha staff client home page > E-Resource management > eHoldings > EBSCO > Packages
- Search for a package with the 'Selection status' dropdown = 'Selected'
- Click on a package
- Click 'Remove package from holdings' – highlighted yellow in the below screenshot.

Local eHoldings
Local eHoldings are electronic resources stored in the Koha catalogue – for example eBooks, streaming videos, electronic journals and websites. Local eHoldings are not reliant on a library having an EBSCO subscription.
Searching local eHoldings
Searching local eHoldings is a very similar workflow to searching agreements and licenses. Going to either the local packages or local titles pages (Koha staff client home page > E-Resource management > eHoldings > Local > Packages and Koha staff client home page > E-Resource management > eHoldings > Local > Titles) a table of records is loaded.
Using the search box or column filters in the second row of the table the results can be narrowed down.
Populating local eHoldings titles and packages
Upon first using the local eHoldings in the ERM module no local titles or packages will exist. This differs from the EBSCO eHoldings pages: EBSCO eHoldings fetch packages and titles from the external EBSCO Knowledge Base. Meanwhile, local eHoldings are stored in the Koha database, so searches will return noting until library staff populate the ERM module with local titles and packages.
It’s a good idea to create local packages before local titles. Doing that means when you start creating local titles you can link them to your pre-exisiting local packages – which triggers Koha to automatically create a Koha bibliographic record for the title using the data entered into the ERM module – saving cataloguers from creating a biblio record from scratch!
Create the local package:
- Go to: Koha staff client home page > E-Resource management > eHoldings > Local > Packages > New package
- Create a new local package – link it to a pre-existing agreement (highlighted yellow in the below screenshot).

Create the local title and add it to the local package:
- 1) Go to: Koha staff client home page > E-Resource management > eHoldings > Local > Titles > New title
- 2) Enter information about the title - making sure to choose the pre-existing local package under 'Add to another package' – highlighted yellow in the below screenshot.

- 3) After submitting find the local title you just made
- 4) Notice beside the 'Publication title' there is a 'Local bibliographic record' link – highlighted yellow in the below screenshot.

- 5) Click on the 'Local bibliographic record' link to see the automatically generated bibliographic record. Edit it to have an appropriate 942$c (Koha item type). This bib record is immediately searchable in the OPAC.

Note: The Koha 22.11 manual(external link) lists which values from the local title (in KBART metadata format) are mapped to specific bibliographic MARC fields when the bibliographic record is automatically generated.
Batch import local eHoldings titles
As long as your electronic resources are in a MARC file, or can be imported via Z39.50, then you can batch import into local eHoldings titles:
- Either stage a MARC file (Cataloguing > Stage records for import) and import staged records (Cataloguing > Manage staged records), or import via Z39.50.
- Add all the imported bibliographic records to a Koha list
- Go to: Koha staff client home page > E-Resource management > eHoldings > Local > Titles > Import from list
- Choose which local package you want the new local titles to be added to – highlighted yellow in the below screenshot.
- From a table of lists choose which list you want to import, and click 'Import' in the 'Actions' column – highlighted yellow in the below screenshot.

Future development
You can track future development of the ERM on the Kanban.(external link)
Additional resources
- Check out the latest release notes for Koha 24.11
- PTFS Europe video tutorials
Catalyst Koha support with Rōpū kohinga
If you have any questions or would like some support with your Koha instance, you are welcome to contact us).
