08 Jan 2019, 9:00 AMAuthored by: Alex Buckley | Rōpū kohinga Developer at Catalyst
Dive into the latest in Koha tips and tricks to get the most out of your library system.
In this blog post, Alex Buckley, Rōpū kohinga Developer, covers how to change the bibliographic information displayed in the OPAC and solutions for a couple of the more common OPAC display issues.
4 Koha tips and tricks
1. How to alter the ‘material type’ of a bibliographic record
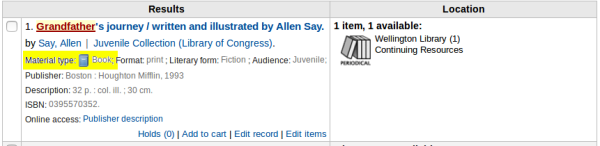
Material type is a value stored in the bibliographic record. It is displayed by default in both the search results and details pages in both the Koha staff client and the OPAC (more on how to change what is displayed in these interfaces in tip #2).
The material type value is defined in a bibliographic record as a single character stored in the 006 (7th position) of the leader field (first field in a MARC record).
If the material type of a biblio is incorrect, there are several ways to address this issue with Koha:
Hide the material type in the Koha staff client and OPAC
1) Go to Administration -> Global system preferences -> Search for ‘material type’.
2) Set the ‘DisplayIconsXSLT’ and ‘DisplayOPACiconsXSLT’ system preferences to 'Don’t show'. This hides the material type information from being displayed in the staff client and OPAC interfaces. (Note: this will also hide the ‘format’ and ‘audience’ information.)
Manually modify the material type
3) In the staff client, search for an item and click on the item from the search results
4) Select the ‘Edit’ button at the top of the page
5) Select the ‘Edit record’ drop-down option
6) Change the 7th character in the 000 Leader field. For example, changing this value to ‘b’ results in the material type being set to ‘Article’.
Batch modify the material type of multiple bibliographic records.
Catalyst has a script called fix_leader.pl. This script can update the material type values in the leader field of bibliographic records so the material type matches the itemtype of the biblioitems. The script retrieves the biblionumber of all bibliographic records with an item level item type of ‘Continuing Resources’, and it goes through and changes the leader of each biblio to serial.
At present, this only works for changing the material type where the itemtype is ‘Continuing Resource’ (i.e. a periodical), however, with a small modification, this script can work with a variety of item types.
2. How to customise the display of search results and book detail pages
In Koha, on the search result and the individual book detail pages in both the staff client and OPAC interfaces, you will notice that information about the book is displayed.
It is possible to change the default information about the book that is displayed. The files that define what is displayed are written in a format called XSLT(external link) (eXtensible Stylesheet Language Transformations). It is used to convert files from one format (XML) to another format (HTML). The XSLT files that are displayed are defined in the following system preferences:
XSLTDetailsDisplay – This XSLT file is used in Staff client biblio detail page
XSLTResultsDisplay – This XSLT file is used in Staff client search results interface
OPACXSLTDetailsDisplay – This XSLT file is used in OPAC biblio detail page
OPACXSLTResultsDisplay – This XSLT file is used in OPAC search results interface
So what you can do is ask your Koha support vendor to create a custom XSLT file from one of the existing community XSLT files, then amend it to show the MARC fields you are interested in displaying. Upload this file to the Koha server, and change the appropriate aforementioned system preferences to point to the new custom XSLT file.
3. How to fix and hide the ‘No cover image available’ box appearing in OPAC search results?
This box is displayed because you have the OPACLocalCoverImages system preference enabled, and Koha can find no local cover image for that biblio. Figure 6 is also displays a cover image; this is because the AmazonCoverImages system preference is enabled and Koha has been able to retrieve a cover image from Amazon.
Hiding the ‘No Cover image available’ box is easy:
1) In the Koha staff client go to: Administration-> Global System preferences
2) Search for OPACUserCSS
3) Paste the following CSS code into the OPACUserCSS syspref:
.no-image { display: none !important; }
4. How to fix broken styling in an upgrade
After upgrading your Koha instance to 18.05.x version, you may find that the styling of your site is broken.
Figure 8. Koha OPAC home page with broken styling after upgrading to Koha 18.05
There are two fixes for this, outlined below. Attempt Fix 1 and if that doesn’t resolve the issue, then try Fix 2:
Fix 1:
Ask your Koha support vendor to reload and restart apache2, with the following terminal commands:
sudo /etc/init.d/apache2 reload
sudo /etc/init.d/apache2 restart
Fix 2:
(i) Ask your Koha support vendor to add the following two Apache rewrite rules to the /etc/koha/apache-shared-intranet.conf and /etc/koha/apache-shared-opac.conf files.
If your Koha instance is running off a gitified directory (your Koha support vendor will know if this is the case) then your vendor will need to add those Apache rewrite rules to different files: /etc/koha/apache-shared-intranet-git.conf and /etc/koha/apache-shared-opac-git.conf
Once complete, save, then exit the file.
(ii) As above in Fix 1, reload and restart apache2 with the following terminal commands:
sudo /etc/init.d/apache2 reload
sudo /etc/init.d/apache2 restart
Now reload your webpage, and the styling should be displaying correctly.
Koha support
Rōpū kohinga at Catlayst care for collections with open source technology. We have over 15 years of experience working with Koha, and would love to help you get the most out of your library. Contact us for Koha support.